ReadMe File
1) General features & FAQs for all ZEN NDI® utilities
2) This NDI-RTx utility was originally created in 2016 because I wanted something to run on a remote PC to perform an “NDI loopback” so I could monitor the effects of a round-trip over a network (e.g. bandwidth used, dropped frames), measured on the same PC as the NDI source (using my Framecode Generator/Analyser).
After I started using it I then realised that something like this can be used as a sort of “NDI CDN” to distribute network bandwidth by creating remote “splitter-nodes” at various locations and offload work from the switcher PC. From there it grew significantly to include a variety of built-in processing options and additional outputs.
Usage Notes
3) The “Extra IP” field allows a specific IP address to be searched for NDI sources (as well as the current subnet addresses).
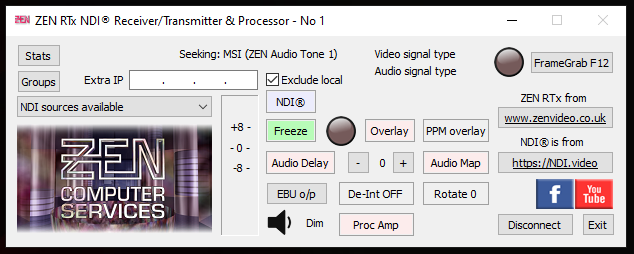
4) The “Exclude local sources” option prevents detection of NDI sources generated on the same PC. Given that the main purpose of NDI Relay is to take a remote source and re-distribute it to other PCs, this option is enabled by default.
5) From RTx v1.3.x onwards it is also possible to limit the detection of NDI sources to one or more specified NDI Groups which may or may not include the default (Public) group. Click on the Groups button to bring up the settings dialog box.
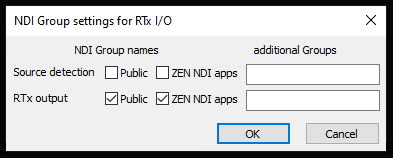
In the example above, Source detection is limited to Public groups, the default setting when nothing is selected. When any additional groups are specified/selected, the Public checkbox determines whether the Public group is also included so, in the example above, the RTx output is a member of both the Public & ZEN NDI Apps. Group names may be typed into the respective “additional Groups” edit boxes, separated by commas should multiple groups need to be specified.
6) NDI sources on the LAN are continuously detected and accessed by the drop-down menu on the left of the GUI, above the image monitor. Select a source to connect to it and the name will be shown on the top line of the window, along with the IP address. Selecting another source while one is already connected will disconnect the first one, or you can click the Disconnect button.
Starting in v1.3.x a config file can be saved on exit and loaded/used on start-up, depending on the Load & Save settings in the system menu (below). The file uses a .rtv file extension (named lastX.rtv, where X is the instance number of the copy of RTx, shown in the title bar). Note that, as yet, not all saved attributes are restored and active when loaded – some are more difficult to implement than others – but work is slowly progressing and one of the more popular requests, to automatically reconnect to the last used NDI source, is present from v1.4.x.
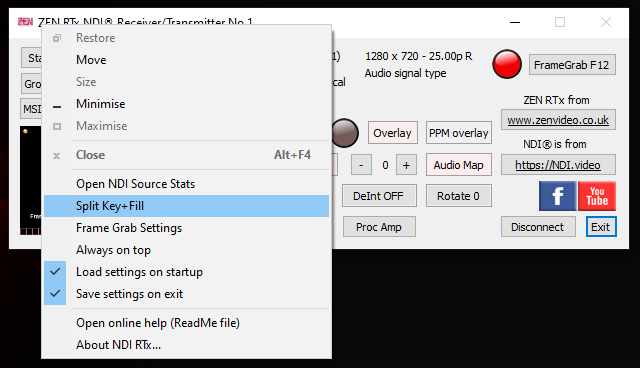
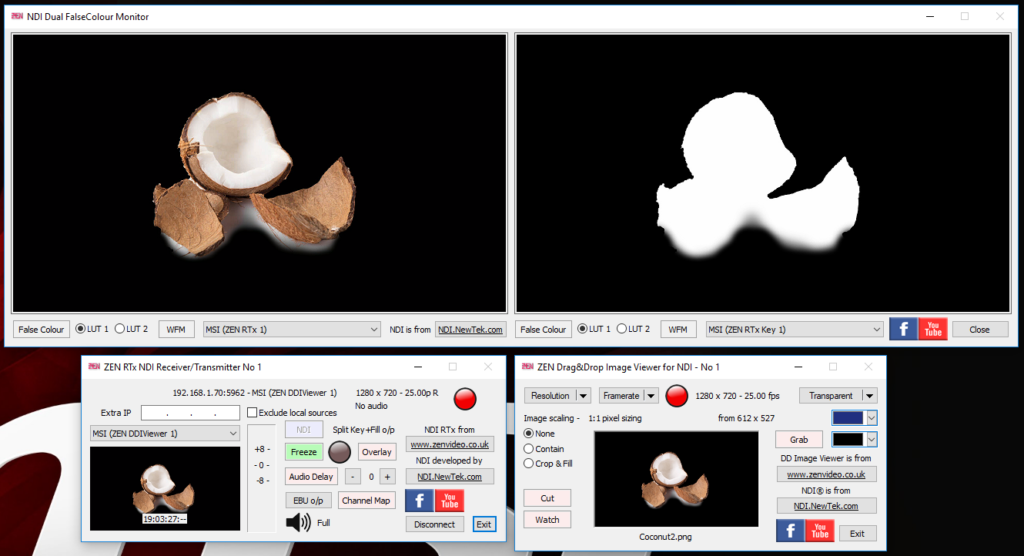
7) Enabling the “Split Key+Fill” option in the system menu (Rt Click, top left) creates a second NDI source for the re-transmitted NDI, such that when the input source contains an alpha channel (in RGBA format), the alpha content is copied to the Key output stream as luma values in NDI YUV format (as in the picture below).
The words “Split Key+Fill o/p” will appear in the main GUI only when (1) the menu item is enabled, and then (2) you select an NDI source which contains an alpha channel. This serves as a confirmation that a suitable signal has been detected and that separate NDI streams for Key & Fill are being generated.
8) The NDI / AirSend button toggles the output between NDI and AirSend modes (via different auto-named output devices). Incoming NDI video (with alpha) can be re-transmitted as an AirSend source for feeding into older-model Tricasters. No audio is sent in AirSend mode, nor is Split Key+Fill mode possible. Changing modes can only be performed when no NDI source is connected.

9) The Freeze button can be used to grab and hold (ie Freeze) the incoming video that’s being retransmitted. The button text changes to Restart to restore normal operation, and the “indicator light” to the right of the button will flash Red/Green when Freeze is active.
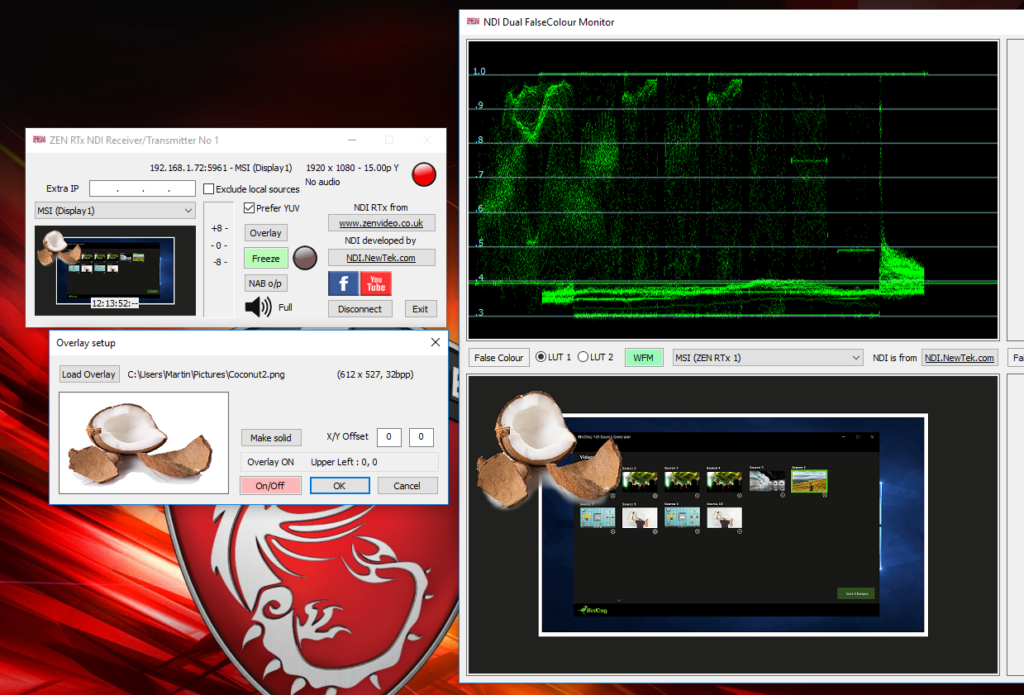
10) The Overlay button opens a dialogue box in which an overlay image may be loaded, positioned and enabled (On/Off). Embedded alpha/transparency data will be used if present, or the whole overlay image can be made opaque if no alpha channel is included (making it suitable for adding small rectangular logo images). Overlays are always added at a 1:1 pixel ratio. E.g. an overlay image measuring 250×100 pixels will potentially cover 250×100 pixels of the source video. Clicking on the quadrants of the preview image in the dialogue box will cause the overlay to be relative to top-left, top-right, lower-left or lower-right positions, combined with the X/Y numeric offsets.
Animated image sequences may also be loaded, and can be positioned in a similar manner. There is no requirement for the image size to match the size of the video onto which it will be overlaid; in fact there is a positive advantage in making the image files with the pixel size no bigger than is required to contain the animated object, as this will save on RAM usage when a sequence with a large number of images is loaded. Sequences are loaded in the same way as single images but, if consecutive numbered files are detected with the same base name as the selected file, you will be given the option to load the rest of the sequence.
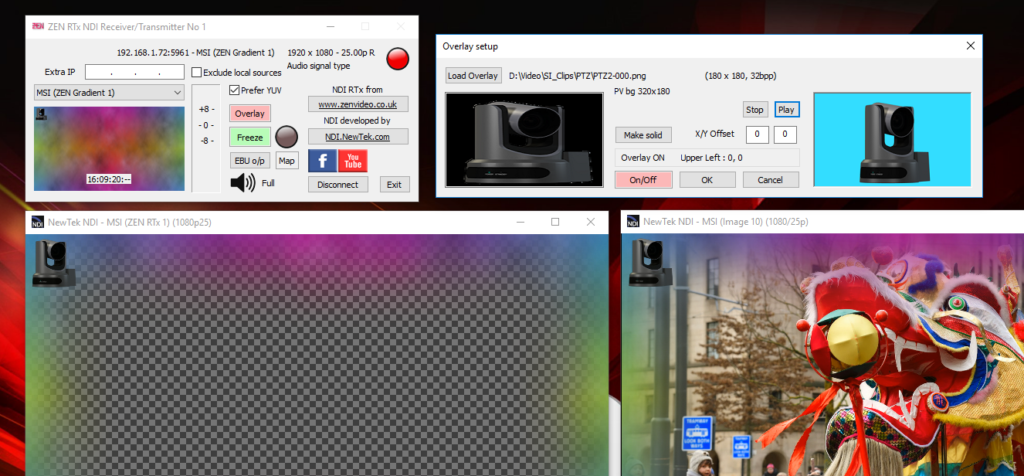
Once the sequence has been loaded, it can be played in the preview
panel on the right of the Overlay setup window via the Stop/Play buttons. The Preview overlays the image sequence on a solid colour background and is intended for checking that the sequence looks as expected. These Stop/Play buttons are only for the Preview and do not control the overlay on the NDI output, which is enabled/disabled via the On/Off button, as for static overlays. The Overlay setup controls are in a “modal dialog box” so it should be closed when setup is complete.
Images are overlaid in a looped sequence, with each new frame of incoming video receiving the next frame in the sequence, so the actual playback frame rate will match the current NDI source video. This should be considered when creating animated image sequences.
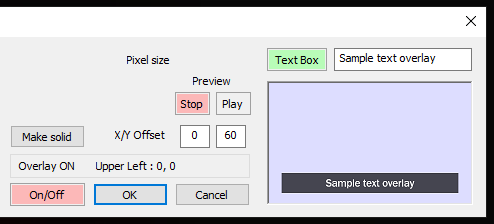
Also in the Overlay dialog is the option to create a “Text Box”, a simple one-line subtitle, as an alternative to a loaded image. This function may be externally controlled from the NDI PA Prompt app.
11) The Audio Delay function will delay the re-transmitted audio. It can be enabled or disabled and the delay time adjusted in 1 frame increments, up to a maximum of 15 frames .
12) The EBU/SMPTE o/p button controls the conversion between NDI floating point audio and the signed integer audio that is fed to the default Windows audio output device for monitoring. It also affects the display of the PPM overlay, when active. NDI audio uses notional dBu values for audio levels, so EBU uses the 0dBu = -18dBFS standard while SMPTE converts with +4dBu = -20dBFS (= 0dB VU). The mode is auto-selected when a new NDI source is selected. EBU is used for 25/50 framerates, SMPTE for all others. Should the auto-chosen mode be inappropriate, the button can be used to toggle modes.
13) The Audio Map button opens a dialog box for control of the audio channel mapping and the mono-mix functions. The left hand picture below shows the default mapping, with each input channel passed to the respective output channel, 1:1, 2:2, 3:3, etc. In the middle image the mapping has been changed so that channels 1 & 2 have been reversed on the output (but the other channels remain the same). In the third picture (on the right), the “Ch1/2 Mono Mix” box is ticked, so outputs 1&2 are both taking a mix of input channels 1&4, and outputs 3&4 are taking input channels 3&2 respectively.
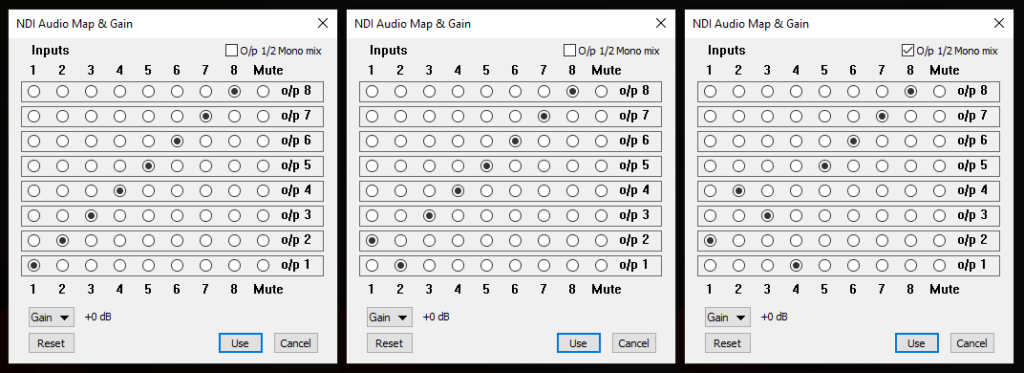
The channel mapping functions allow higher numbered audio channels to be remapped to channels 1&2, for applications which only decode the first two channels, or for any two channels to be mixed together into a single channel for applications which only take a single NDI audio channel for their input, by using the Mono Mix.
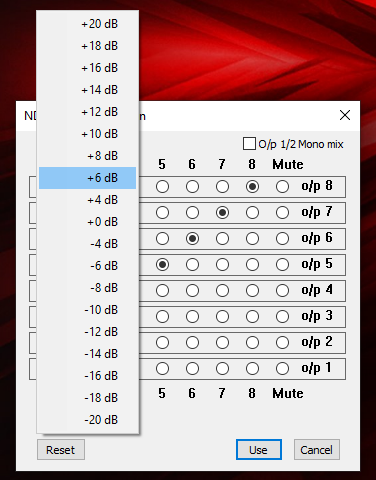
Also in the Audio Map dialog box is the Gain menu, accessed via the Gain button, which allows up to 20dB of gain or attenuation to be applied to the retransmitted audio output. The same value is applied to all output channels, and when the dialog is closed it affects both the audio meter display and local audio monitoring level. However, whilst the dialog is open, if negative gain (i.e. attenuation) is applied, the meters and local monitoring will continue to use the incoming audio level (like PFL).
14) The loudspeaker icon acts as a 3-way Dim & Cut switch for hearing the incoming NDI audio via the default Windows audio output device. Click on the top third of the speaker icon for Full Level, in the middle for Dim (-12dB level reduction), and the bottom third to Cut (i.e. Mute) the audio output. The default setting is Full.

15) The Rotate button selects options for 0 (normal), +90 + 180 & -90 degrees, plus vertical & horizontal flip/mirror. The button cycles forwards or backwards through the options, depending on which side of the button you click on.
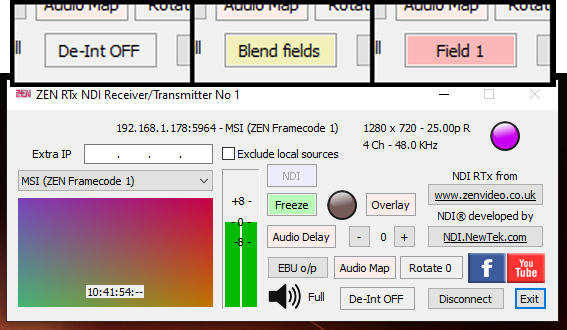
16) The De-Interlace button cycles through options for blending both fields (without vertical shift) or interpolating from either field 1 or 2.
17) The “Open NDI Source Stats” option in the system menu (Right Click, top left) – or via the “Stats” button top left – creates a resizable modeless dialog box which displays a list of NDI sources detected on the network, with each entry comprising the NDI name on the network, pixel resolution (width x height), frame-rate & progressive/interlaced status, whether alpha data is included, number of audio channels & sample rate, and the IP address/port number.
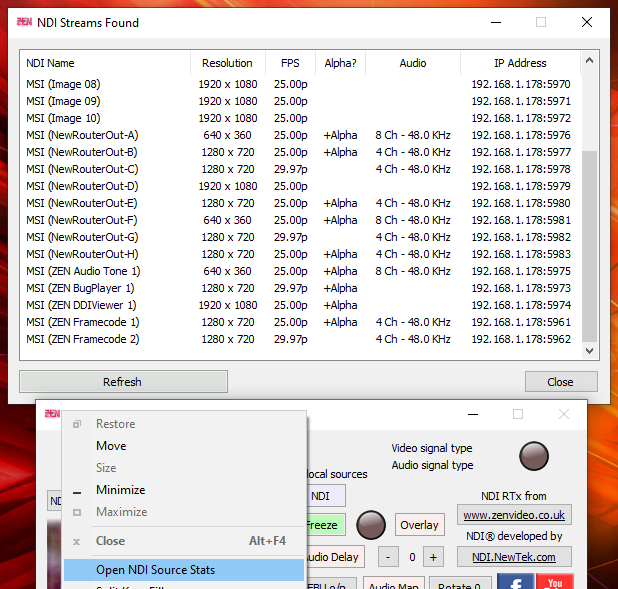
Although the NDI names & IP Addresses can be rapidly obtained as a block of data, there is no equivalent way of obtaining all the other information as to what is present in the NDI streams, so it is necessary to open each source in turn and wait for video & audio frames to be received (or for a time-out to occur), so this process can take some time when a high number of sources are present.
Note also that the results of the scan are affected by the Exclude Local Sources control in the main RTx dialog window, so NDI sources on the local PC will only be shown if this checkbox is un-ticked.
From RTx v1.3.x onwards it is also possible to limit the search for NDI sources to one or more specified NDI Groups which may or may not include the default (Public) group. Settings are included at the top of the Stats dialog box, and work like the Group settings described above in section 5.
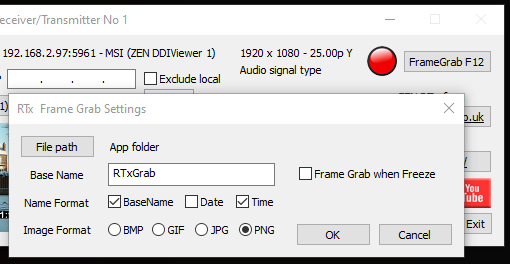
18) Introduced in v1.2.6.34, the Frame Grab feature can save images in BMP, GIF, JPG or PNG formats. The Frame Grab Settings dialog lets you choose the format, how the file name is constructed – including an editable base name, date & time – and the path to which the images will be saved.
Frames are grabbed using the button (top right of the GUI) or by pressing the F12 key when the app has the keyboard focus. It is also possible to initiate grabbing via an external “Windows Message”, and the RTx download package includes a sample utility which can control up to four instances of RTx, individually or all four simultaneously.
Enabling the “Frame Grab when Freeze” function causes a frame to be grabbed/stored whenever the Freeze button is activated.
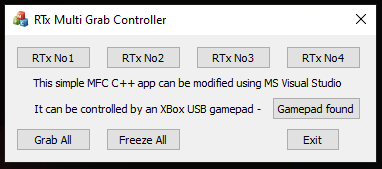
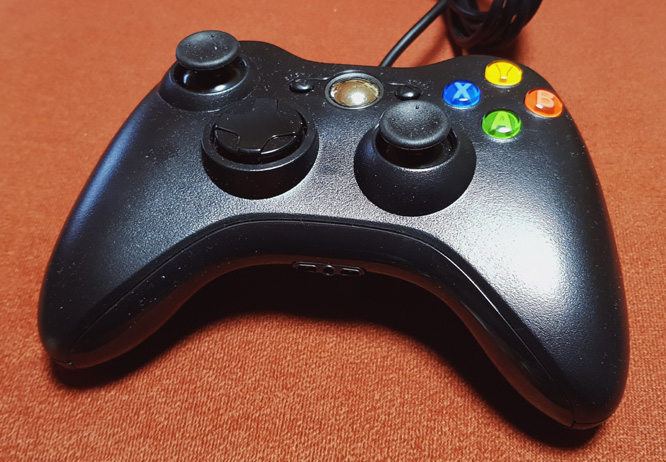
19) The RTxMGC app is supplied as a complete MS Visual Studio C++ project which can be modified or used as an example of how to control both the Frame Grab and Freeze Frame functions on multiple instances of RTx, albeit with all of them on the same PC. Version 1.1 also supports a standard XBox USB gamepad, as below, with the A & B buttons mapped to the RTx No1 & RTx No2 grab controls, and the X & Y buttons mapped to Grab All & Freeze All respectively.
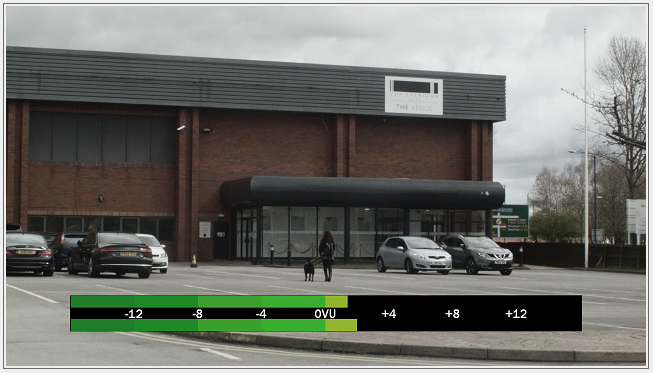
20) The PPM Overlay is an in-vision audio meter which can be added to the re-transmitted NDI output, toggled on or off via the PPM Overlay button. Right-clicking on the button opens the PPM Config dialog. There are slider controls for setting the position of the meter, with radio buttons and tick-boxes for selecting other options, like Horizontal/Vertical orientation.
The two tick-box options control where the meter is generated, either as an overlay onto the main RTx output, or as a separate NDI stream (with alpha channel) which can be used as an overlay source in an external application.
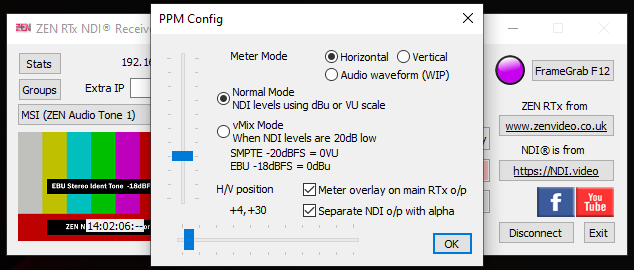
In Normal Mode, the meter shows NDI audio levels as defined in the NDI SDK, in which floating point values relate to traditional EBU & SMPTE analogue audio levels in dBu (or dBVU, where 0dBVU = +4dBu). RTx will auto-detect EBU/SMPTE mode based on the frame rate of the incoming video, or it can be manually toggled via a button in the main RTx interface. In EBU mode, the meter shows dBu-equivalent values, with 0dBu in the centre of the scale, and in SMPTE mode the values are in dBVU.
vMix Mode is designed for those who wish to monitor the NDI output from vMix in the default mode (ie. without the 20dB Boost box ticked). This results in NDI audio that is typically 20dB lower than the recommendations of the NDI SDK (which is why the 20dB Boost was eventually added). Nor does vMix differentiate between EBU & SMPTE audio standards, so vMix Mode attempts to rectify both of these issues and create meter displays that conform to either standard, depending on what the user is most familiar with.
Therefore, given that the EBU reference level (0dBu) is equivalent to -18dBFS, in EBU mode a level of -18dBFS from vMix with display as 0dBu on the PPM. In SMPTE mode, the reference level of -20dBFS from vMix will display as 0VU on the PPM.
The Audio Waveform option is an experimental feature, very much a work-in-progress…
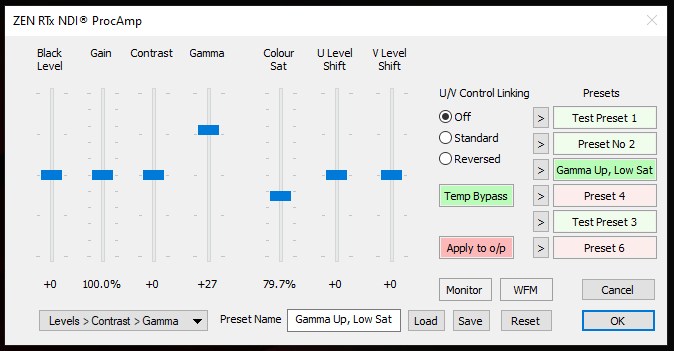
21) The ProcAmp dialog window contains the controls for adjusting settings and loading/saving Presets, either direct to disk or to/from the six built-in memories. The four slider controls on the left affect the Luma, and the three on the right affect the Chroma components of a YUV signal (typically camera outputs or other NDI video without an Alpha channel). For NDI signals received in BGRA format (i.e. including an Alpha channel), the controls have no effect on the main RGB part of the signal, but the four Luma controls can be used to adjust the Alpha channel. Clicking on any of the numeric values under the sliders will reset that slider to its default (centred) position.
The drop-down menu under the Luma sliders affects the order in which Contrast & Gamma adjustments are applied, which for more extreme settings makes a noticeable difference. U/V Control Linking locks the U & V sliders together, which can be useful in certain circumstances. E.g. Using Standard mode gives a rough “cooler/warmer” colour temperature adjustment, while Reversed produces a green/magenta shift.
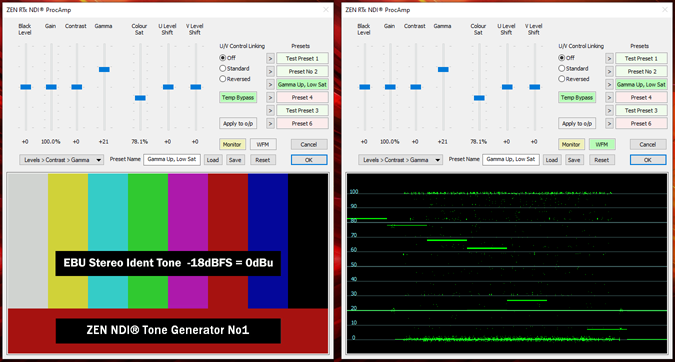
The Monitor & WFM buttons open a drop-down monitor window and change its function to a Waveform Monitor, allowing you to see the results of your signal adjustments. The Temp Bypass button disables ProcAmp processing for as long as it is held down (by the left button on the mouse), as indicated when it shows red instead of green.
The Preset Name edit control lets you set a name for saving the current control configuration, either to disk (by clicking on Save) or to one of the built-in memories (by clicking the [>] buttons next to the Preset buttons). Presets saved to disk use the Preset Name with a .pap file extension, and are stored in the same folder as the RTx app.
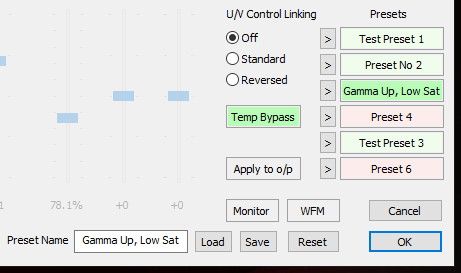
The Preset buttons are colour-coded green for the currently selected preset, pale green for a preset memory with active data (i.e. not simply the mid-position defaults), and pale red to show “empty” presets with default data (which has no effect when processing video). Clicking on a Preset button will transfer its data to the controls and make it the “current Preset”. The Reset button will “zero” the controls back to their mid-position defaults (but not change the “current Preset” memory contents unless copied back by using a [>] button). The Load button allows a saved .pap file to be restored to the “current Preset” memory, with the values also applied to the sliders, etc.
TROUBLESHOOTING
If you are experiencing performance issues when retransmitting NDI streams, the first thing to check is your overall CPU usage on the PC that’s running it (using the Process or Performance tabs in Windows Task Manger). RTx is entirely CPU-dependent, so a fast multi-core CPU is definitely an advantage, and laptops are often less powerful in this respect than desktops with what can appear to be a similar specification. If you are running into high CPU usage at your required resolution/framerate, make sure you are using the 64bit (x64) version if at all possible, and disable the Video Preview window when not required. Click on the Preview window to toggle it On/Off.
FACEBOOK User Group
There is a support/discussion User Group page on Facebook – “ZEN’s Software Apps & Utilities for NDI” – just agree to the rules in order to join.
Martin Kay
ZEN Computer Services
www.zenvideo.co.uk
Version History
v1.0.0.7 3-Oct-2016 Earlier release as an NDI signal repeater, with no local A/V monitoring.
v1.0.0.8 27-Oct-2016 Added audio level meter and local audio monitor output.
v1.0.1.9 24-Nov-2016 Added “Exclude local sources” option and fixed a display/selection issue when large numbers of NDI sources are present. Testing with NDI v2.0 beta.
v1.0.2.0 7-Dec-2016 Recompiled with NDI v2.0 libraries and added a small video preview window/confidence-monitor.
v1.0.3.0 21-Apr-2017 Added a “Freeze Frame” function, re-using what was the Refresh button (under the video preview) on earlier versions. Also added an “Always on top” option in the main drop-down window menu.
v1.0.3.1 12-Sep-2017 Recompiled to extend the expiry date. No other changes.
v1.0.3.3 11-Oct-2017 Improved smoothing to audio meter fall-back. Preview of YUV video now in colour.
v1.0.4.0 9-Feb-2018 Slightly revised GUI layout/controls but no changes to the headline features.
v1.0.4.1 21-Feb-2018 Small bug fix to NDI Source Selection control, which could cause a crash.
v1.0.5.0 21-May-2018 Added logo/overlay function. Recompiled with NDI v3.5 libraries.
V1.0.6.8 27-Nov-2018 Added Audio Channel Mapping, Ch1/2 Mono Mix, Audio Delay, and Image Sequence Overlays. Compiled with NDI v3.7 libraries.
V1.0.6.10 26-Dec-2018 Minor tweaks & fixes. Compiled with NDI v3.8 libraries.
V1.0.7.12 20-Feb-2019 Added NewTek “AirSend” capability (video only) to support sending of video (with alpha channel) to older model Tricasters which don’t support NDI.
V1.0.7.13 3-Mar-2019 Added “Split Key+Fill” option, which will generate a second NDI stream containing the alpha/key signal when the NDI source is in RGB+Alpha format.
V1.0.8.15 9-Nov-2019 Recompiled with NDI v4.1 libraries. Added an on-off toggle for the video preview by clicking in the video window.
V1.0.8.16 9-Dec-2019 Added Rotation feature, with options for 0 (normal), +90 + 180 & -90 degrees, plus vertical & horizontal flip/mirror. The rotate button cycles through the options, forwards or backwards depending on which side of the button you click on.
V1.0.9.17 22-Dec-2019 Added De-Interlace feature. With options for blending both fields (without vertical shift) or interpolating from either field 1 or 2.
V1.1.0.18 30-Dec-2019 Added the “NDI Source Stats” display window feature to scan for all NDI sources on the LAN.
V1.1.0.20 1-Jan-2020 Improvements/fixes to the Source Stats feature. Added a Progress Bar and a variable number of decoder threads (up to 4) to speed up scanning of NDI sources.
V1.1.0.21 2-Feb-2020 Recompiled with NDI v4.1.5 libraries. Both 32 bit (x86) and 64 bit (x64) code versions are included (but no audio output in the 64 bit version).
V1.1.0.23 27-Sep-2020 Recompiled with NDI v4.5.3 libraries.
V1.2.0.26 10-Feb-2021 Improved multi-threading to tackle audio retransmission issues. Recompiled to include NDI v4.6.0 libraries.
v1.2.1.27 18-Mar-2021 Recompiled to extend expiry date and use the NDI v4.6.2 DLL. Also added F1 & System Menu methods of accessing the ReadMe online, and sponsor ads at start-up.
v1.2.2.28 1-May-2021 Added the Audio Gain function, accessed via the Audio Map dialog.
v1.2.2.29 6-Jun-2021 Fixed the audio monitoring for the x64 version of RTx
v1.2.3.31 10-Jul-2021 Fixed a bug in the preview displays for non-16:9 aspect ratios. Added the TextBox overlay option.
v1.2.4.32 22-Oct-2021 Recompiled to extend the expiry date and use the NDI v5.0.3 DLL. 64-bit only (no 32-bit version in this release)
v1.2.5.33 31-Mar-2022 Includes “hidden” work-in-progress version of the Video Proc-Amp feature – user feedback welcome! See the video on the Blog page for more details.
v1.2.6.34 11-Apr-2022 Includes a video/waveform monitor in the Proc-Amp dialog, a new Frame Grab feature, and a sample “multi-grab” controller app (RTxMGC) complete with MSVC Project file & source code. See this Blog page.
v1.3.0.35 29-May-2022 Includes support for setting NDI Group names, both for selecting sources from particular groups and making the output a member of the specified group(s). The sample RTxMGC controller app & source code adds support for USB XBox controllers to control the Frame Grab & Freeze Frame functions on one or more instances of RTx.
v1.3.1.37 16-Jul-2022 Added an optional PPM-style audio meter overlay to the NDI output. Includes a “vMix mode” for sources where the NDI audio level is typically 20dB lower than expected (i.e. as defined in the NDI SDK). Includes the NDI® v5.1.4 DLL.
v1.3.2.38 17-Apr-2023 Maintenance release, includes revised expiry warning dialog and extended lifetime, plus the NDI®5.5 DLL.
v1.3.3.41 9-Oct-2024 Various improvements to saving and reloading general configuration settings (not yet 100% complete), with separate Load/Save functions for ProcAmp presets. ProcAmp luma controls can be used to modify the Alpha channel when BGRA sources are being received.
v1.4.0.42 15-Oct-2024 More improvements to the ProcAmp to include six built-in Preset memories that are stored in the main config file, complementing the functions to Load & Save individual Presets (introduced in the previous version).

