ReadMe File
1) General features & FAQs for all ZEN NDI® utilities
Usage Notes
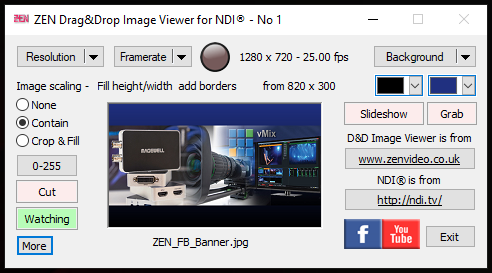
2) Image files can be drag-&-dropped onto the preview window to output them as an NDI® source, with an optional background. The NDI® resolution is independent of the image size, and is set via a drop-down menu button, along with the NDI® framerate. Supported image formats include bmp, gif, png & tif file formats, at up to 32bit/pixel (i.e. including alpha/transparency).
3) By default, the output will be in RGBA mode (RGB + alpha/transparency), so that any embedded alpha information in the image files is transmitted over NDI®. If alpha information is not required (e.g. to send to a BirdDog NDI® Decoder – one with firmware that doesn’t accept RGBA format), there is a “No alpha output” option in the system menu (Rt-click – top left).
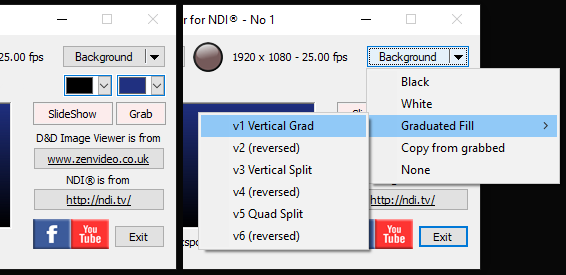
4) Different background options are available, which will appear when the source image doesn’t fill the screen. The options are selected from the menu button on the top right.
a) “Black” is a solid black background.
b) “Graduated Fill” uses two colours, which can be changed via the colour buttons below the Background menu button, and includes 3 patterns, each with the ability to quickly swap the colours via the respective “reversed” option.
c) “Copy from grabbed” enables any image to be grabbed and used as a custom background. Drag and drop a suitable image in the usual way, then press the “Grab” button (which will change to show “Grabbed” when active), and then select the “Copy from grabbed” menu item to create a new background. Note that the background can include transparency – the grab function will take whatever is currently on the output.
d) “None” is a transparent background.
5) Three Image Scaling modes are available. Images are centred on the output and maintain their original aspect ratio in all modes.
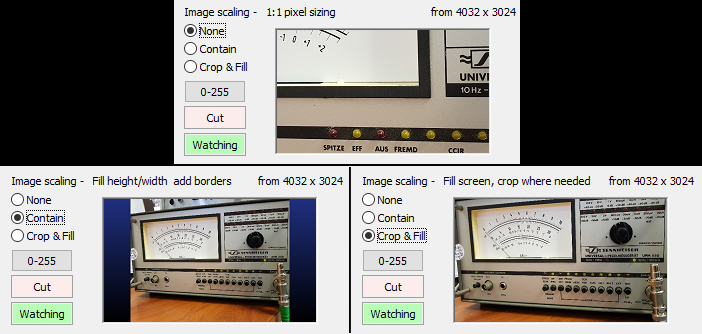
a) “None” will use the source image with 1:1 pixel sizing (i.e. no scaling). Images will have a border (i.e not fill the screen) or be cropped to fit, depending on the relative size of the image and the chosen NDI® output resolution.
b) “Contain” will scale the image with the aim of filling the screen, but without cropping, therefore leaving borders if the aspect ration doesn’t match.
c) “Crop & Fill” will scale the image to fill the screen so that no borders remain. Parts of the source image will be cropped if the aspect ratio doesn’t match the output.
6) The 0-255 / 16-235 button is for selecting source quantization level. The default setting assumes the image uses 8-bit values from 0-255. Selecting 16-235 will convert the image to 0-255 using a simple 8-bit LUT (and therefore increase the contrast whilst clipping blacks below 16 and whites above 235).
7) The Cut/Fade transition button (lower left) selects between a straight cut and a short crossfade when a new image is loaded.
8) The Watch/Watching button enables a “watch” on the last loaded image file and, when active (green) will reload it if the file is updated.
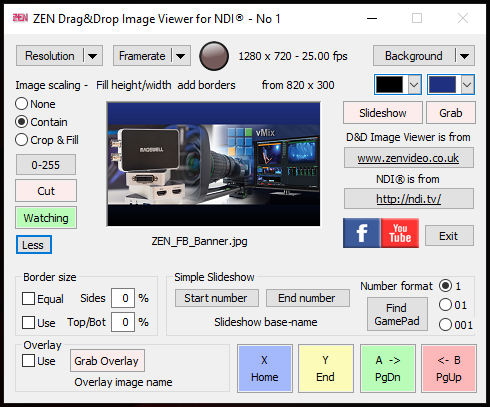
9) The “More” button expands the user interface to include the Border/Overlay and Simple Slideshow functions (in v2.0.x onwards).

10) The Overlay function was designed for adding “picture frame” borders, overlaid onto the drag-&-dropped images, but it could be used to add any sort of overlay, like a logo. Overlay images should be .PNG files with the required transparency. Start by dropping the overlay image into the preview window, then click the Grab Overlay button. The selected file name will appear under the button. The Use tick-box enables the overlay.
11) The Border function is used to redefine the target area used by the Image Scaling “Contain” and “Crop & Fill” functions. Typically it would be used in conjunction with a border overlay image so that images are suitably reduced in size and do not have their edges obscured by the border overlay.

The reduction values are entered as percentages rather than absolute numbers of pixels in order to accommodate changes to the output resolution. Separate values can be entered for the Sides and Top/Bottom, or if the Equal box is ticked then a single value will be applied all round.
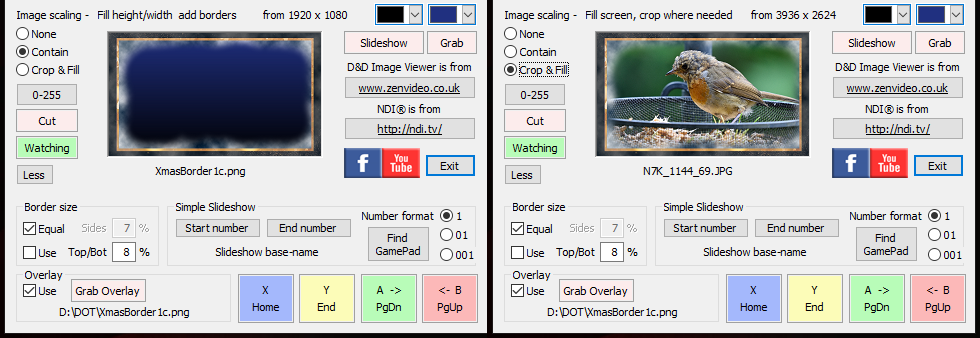
12) The Simple Slideshow functions provide a way to generate a slideshow sequence over NDI, controlled by keyboard, mouse or X-Box controller. The reason it is named as “Simple” is because it is not “smart”, so some preparation work is required in order to use it.
a) All images must be in the same folder.
b) All images files must use the same file format (e.g. .jpg) and share the same “base name”, followed by a number. e.g picture1.jpg, picture2.jpg, etc.
c) All files must use the same numbering convention with regard to leading zeros. Three options are permitted:
(i) No leading zeros, so numbers proceed from image9 to image 10, etc.
(ii) One leading zero, so numbers proceed from image 09 to image10, etc.
(iii) Two leading zeros, so numbers proceed from image 009 to image010, etc.
Set the Number format radio button to match your chosen option.
Image names should be pre-edited to fit these requirements, with image numbers allocated in the order they will appear in the slideshow. However, there is some flexibility, in that gaps can be left in the numbering to allow for insertion of extra images or a degree of reordering by editing the numbers. The Step Forward and Step Back functions will look for the next available image and skip the gaps, e.g. if the current image is picture12, and the next highest number is picture18, it will jump between them on playback as if they were adjacent numbers.

Having created a folder with suitable image files, the next step is to set up the Slideshow. To do this it is only necessary to define the first and last images in the sequence. This is done by dropping the appropriate image into the Preview window and clicking either the Start Number or End Number button.

The buttons will then confirm the start & end image numbers and the base name/path will be shown underneath – as long as both images use the same base name/path, or else an error message will be displayed.
Finally, use the “Slideshow” button top right of the main part of the user interface to cycle through the slideshow modes, Off-On-Auto.
To manually control the slideshow, there are 3 options

a) Use the keyboard shortcuts Home & End, to jump to the first/last images, and Page Down & Page Up to step forwards or backwards through the numbered images.
b) Click on the coloured buttons with the mouse.
c) Connect a USB XBox controller, click the Find Gamepad button and, if “found”, use the coloured X, Y, A & B buttons.

Whilst in Auto mode (Slideshow button = green), the image display will auto-advance according to the Duration value, which can be set between 2 & 240 seconds. After reaching the End image the sequence will loop back to the Start image.
13) The current config/settings can be saved and loaded at start-up, using several options in the system menu (right-click top left). Included in v1.1.x onwards.
a) When “Use Last” is enabled, the various settings (eg Resolution, Framerate, Background, Cut/fade, etc) will be saved on exit to the “last.ziv” file. This file will be loaded on start-up, if it exists, and if the “Use Last” setting had been applied, then the saved settings will be applied to the new session. When starting additional instances of the Image Viewer (eg. No 2, No 3, etc), the files are named “last2.ziv”, “last3.ziv”, etc, so that different configs can be loaded and saved for each instance.
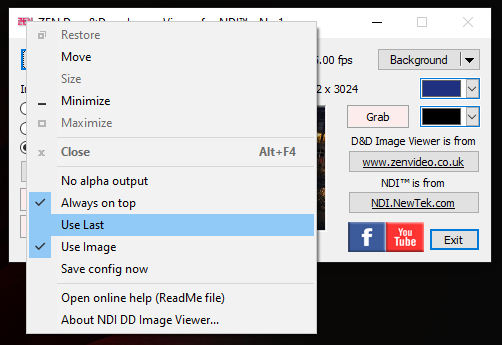
b) When “Use Image” is also enabled, the file path to the currently loaded image will also be saved in the “last.ziv” file, and will be reloaded (after a short delay) if it can be found when the file is reloaded at the start of a new session.
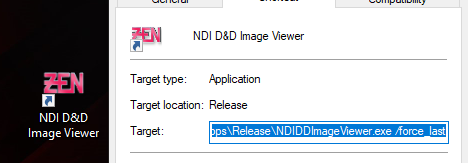
c) There is also a Command Line option that can be used, “/force_last“, which will attempt to use the settings in the “last.ziv” file, even if the Use Last setting is not enabled in the file (which would normally result in it being ignored). The purpose of this option is to create a way to ensure that a particular configuration is always loaded on start-up, irrespective of how (most of) the settings are changed during the session. To create a suitable “last.ziv” config file, apply the settings you require, but ensure “Use Last” is disabled, and then use the “Save config now” menu option to create a config file which, under normal circumstances, will be ignored, but will be forced to load (and the settings used) by the “/force_last” command line switch. Unless the “Use Last” menu option is re-enabled again, no new file will be saved on exit, so the same config will be loaded each time
14) By default, the app window has the “Always on top” attribute set, but this can be changed in the system menu, right click top left.
15) Multiple instances of the Image Viewer can be run, and each will have auto-numbered NDI® source names. Note: it is important to leave a gap of at least 3 seconds between running each instance, to allow the “instance detection” process to complete, otherwise you might be attempting to create multiple instances all with the same NDI® source name.
FACEBOOK User Group
There is a support/discussion User Group page on Facebook – “ZEN’s Software Apps & Utilities for NDI” – just agree to the rules in order to join.
Version History
v1.0.0.1 12-Jan-2019 Initial release as an image viewer generating an NDI® output.
v1.0.0.2 20-Jan-2019 Added a simple “Watch” function (polled every 3 secs)
v1.0.1.3 8-Mar-1019 Added a “No alpha output” menu option
v1.0.2.4 21-Aug-2019 Recompiled with NDI® v4.0 SDK – no other changes
v1.0.2.5 6-Oct-2019 Added 0-255 / 16-235 button for selecting source quantization level
v1.0.3.6 2-Feb-2020 Added 1080×1920 “vertical HD video” resolution and recompiled with the v4.15 SDK. 32 & 64 bit versions included.
v1.0.3.7 27-Sep-2020 Recompiled to extend expiry date and use the v4.53 DLL.
v1.1.0.10 18-Mar-2021 Added “Use Last” & “Use Image” menu options for saving/loading config files. Also added F1 & system menu methods of accessing the ReadMe online, and sponsor ads at start-up. Includes the NDI® v4.62 DLL.
v1.1.0.11 30-Oct-2021 Recompiled to extend expiry date and use the NDI v5.03 DLL. 64-bit only (no 32-bit version in this release).
v1.1.0.12 5-Sep-2022 Recompiled to extend expiry date and use the NDI v5.5 DLL. 64-bit only.
v1.1.0.13 12-Jun-2023 Maintenance release, includes revised expiry warning dialog and extended lifetime.
v2.0.0.16 3-Feb-2024 Includes new features, “Border Overlay” and “Simple Slideshow” – with optional control via an XBox handset.
v2.0.1.18 17-Jan-2025 Adds Auto Advance & Loop to the Slideshow feature.
Martin Kay
ZEN Computer Services
www.zenvideo.co.uk

